Illustration and Visual Narrative/ Task 2 Decisive Moment

6/11/2023- 27/11/2023 (Week 07— Week 10)

Kim Seoyoon/ 0357755

COM 61304/ Illustration and Visual Narrative/ Bachelor of Design (Hons) in Creative Media / Taylor's University

Task 2/ Decisive Moment


LECTURES 

Week 07: Composition

In week 7, Mr Hafiz introduced us to the compositional use of foreground, midground, and background.

Week 7 Lecture Slides


After learning about compositions, Mr Hafiz instructed us to watch an animation short film named "The Soloists" to study the design compositions in the overall video. We were given our own time to watch the film and take notes on the details of foreground, midground and background as well as identify the flow of the plot happening in the film. 


I took screenshots of each scene throughout the film to note down usages of various composition types applied to the animation:


Fig 1.1, Week 7 (6/11/2023)

At the film's beginning, there is a transition from foreground to midground as the characters head to their house. The plot is introduced as they enter the house.


Fig 1.2, Week 7 (6/11/2023)

Fig 1.3 Frame within a frame, Week 7 (6/11/2023)

In the next scene, a frame within a frame composition is used to differentiate people in different spaces. We can notice the overall objects and background environment are flat surfaced (cardboard-like style) which makes the linear transition between spaces more smoother. 


Fig 1.4 Colour Emphasis, Week 7 (6/11/2023)

The idea of the rule of thirds is applied well in this scene along with the colour emphasis of focusing on the two sisters by muting the colours of foreground, midground, and background. 


Fig 1.5 Colour Contrast, Week 7 (6/11/2023)

The use of colour contrast also allows the audience to notice the overall change in mood by utilizing darker tones of colour in the environment, unlike the beginning of the film (warm tone).


Fig 1.6 Golden Ratio, Week 7 (6/11/2023)

This scene utilizes the idea of the golden ratio/ diagonal composition as the lights are beaming out from the UFO. We can also notice that a bright neon range of colours is used on the UFO, perhaps it represents the unusual/ chaotic emotions of the characters going through the plot.


Fig 1.7 Symmetry, Week 7 (6/11/2023)

Fig 1.8 Symmetry, Week 7 (6/11/2023)

There is also the use of symmetrical composition in the scene near the end. The use of a spotlight pointing to the centre/ characters enhances the idea of symmetry as it leads the audience's eyes to the centre, balancing out the overall background.


Week 09: Limited Animation


In week 09, Mr. Hafiz introduced us to limited animation. He also suggested watching a video about the principles of animation that make the animation more interesting.


Week 9 Lecture Slides


WEEKLY EXERCISES

Week 07
In week 7, Mr. Hafiz introduced us to gradients and noise textures. We were given several exercises to practice our skills in gradient and noise application.

Firstly, we were instructed to create different geometrical shapes and 


Fig 2.1 Shape tool, Week 7 (6/11/2023)

Fig 2.2 Gradient & Noise Texture Applied, Week 7 (6/11/2023)

Fig 2.3 Given Ai vector illustration, Week 7 (6/11/2023)

Fig 2.4 After noise application, Week 7 (6/11/2023)


Fig 2.5 Gradient Tool Exercise 1 (PDF), Week 7 (6/11/2023)


Fig 2.6 Gradient Tool Exercise 2 (PDF), Week 7 (6/11/2023)


How to add a transparent gradient
  • gradient/ transparency window opened in Illustrator
  • group elements
  • create a rectangle shape over the element> white to black gradient>apply a layer mask
  • edit>cut> select > transparent> make mask
  • click on the black square
  • cmd v to paste gradient
  • black for transparency/ white for opaqueness

How to apply textures to the gradient
  • copy element control f
  • apply gradient/ press g/ change gradient type
  • change white opacity to 0%
  • effect>texture>grain (e.g. 52;6)
  • change grain type
  • adjust grain opacity according to your taste
  • Press i for colourdrop> press gradient> background gradient applied


INSTRUCTIONS


Module Information Booklet

Task 2—That (Decisive) Moment (20%)

Timeframe: Week 07- Week 09 (Deadline Week 9)


Story Research & Rationale


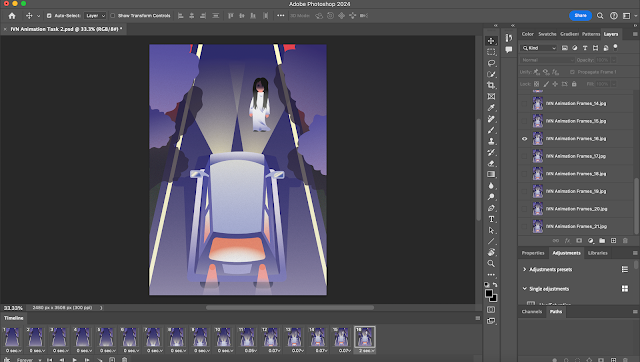
The urban legend I selected is called ”Jayuro Ghost”, this story comes from Korean urban legends where it is known that when someone drives on the Jayuro highway in the middle of the night, they will encounter a woman in their 20s waving their hand for a hitchhike. Most people who saw her on Jayuro highway stated that she was wearing large black sunglasses with a long white coat, but when they looked closely, it was actually not sunglasses but huge empty holes instead of her eyes on her face. 


I also looked up some additional stories related to this urban legend and found out an old Korean TV show has talked about this case.


"One of the reports comes from a man that actually claims to have picked the Jayuro Ghost up when she tried to hitchhike. 

He was driving back from a dinner party and looked away from the road for a second. When he looked up, he saw the woman standing along the highway and he nearly ran her over. It looked like she had just escaped from an accident herself. She asked him if he could give her a ride home. The man accepted and put the address in the navigation system to follow. 

But before they reached the destination, the Jayuro Ghost disappeared. When he found out where the destination was, he realized that it was a cemetery." 

from the website Moonmausoleum 


In fact, the Jayuro Highway is also known for multiple traffic accidents due to frequent fog as it is located near the river area with high traffic, many people doubt that it is just a hallucination caused by careless driving.


Moodboard & Colour Palettes

After researching about the urban legends, I began to create a moldboard along with a colour palette that suits the overall theme of the story.

Fig 3.1 Moodboard & Colour Palette, Week 7 (6/11/2023)


Sketches

I sketched out several draft sketches to compare the compositions and angles and I came up with one finalized sketch layout.
Fig 3.2 Sketches, Week 7 (6/11/2023)


Process on Digitization

After the sketching process, I began tracing my sketch into flat-coloured shapes using the pen tool and shape tools in Adobe Illustrator.

Fig 3.3 Digitization 1, Week 7 (6/11/2023)


Process on Gradient & Textures 


Fig 3.4 Digitization 2, Week 7 (6/11/2023)

Fig 3.5 Digitization 3, Week 7 (6/11/2023)

Fig 3.6 Overall Digitization Development, Week 7 (6/11/2023)


Final Outcome—Illustration

Fig 3.7 Final Outcome Illustration (PDF), Week 7 (6/11/2023)


Process on Frame Animation

Fig 3.8 Frame Process on Illustrator, Week 9 (26/11/2023)


Fig 3.8 Animation Process on Photoshop, Week 9 (26/11/2023)


Final Outcome —Animation

Fig 4.1 Final Outcome Animation (GIF), Week 10 (29/11/2023)


Comments